Repair or Reseal Your Driveway
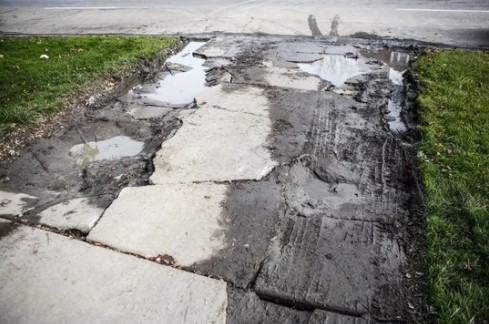
Remember how good your driveway looked when you first had it paved? All sleek, modern, and smooth. Over time, even durable asphalt loses its rich, dark color. Constant use and exposure to the elements can a take a toll on it, as well, leading to cracks or even potholes. Should you repair or reseal your driveway? Should you repave? If it’s too far gone, our team can easily help you repave your driveway. But before then, it may be possible to bring your entrance back to life with a little repairing or resealing.
Prepare your driveway.
Before you start to repair or reseal your driveway on your own, try to pick a sunny day to start the process. Your driveway will need a day or two to dry completely once you’re done. You may also want to trim your landscaping back before you get started to protect it from some of the chemicals in the sealant. While it’s good for asphalt, it’s not so great on your plant life.
Then, you can start cleaning. Now’s the time to break out that seldom-used leaf blower, or a regular broom and remove all the debris. Leaves, flowers, mulch, etc. should all be gone before laying down any primer or sealant—or they may become trapped underneath. For tougher issues, like stains or moss, you may want to spring for a good pressure washing and then use a primer to help cover all traces. Once you have a completely clean surface, you’re ready for the next step.
Patch it up.
 Depending on the current state of your driveway, you may not even need to worry about this particular step. For smaller cracks and/or divots, they actually make asphalt filler that you can apply until it’s level with the surface. As long as you don’t overfill the problem areas, most mild-to-moderate handymen can take care of this themselves.
For more serious holes, you’ll need a full-blown driveway patch and a tamper to make sure it’s pushed down completely. So, you may need to recruit professional help to ensure it’s done correctly. Either way, you’ll need to allow time for your filler to dry before you get to the sealing step. With a simple crack, it needs just a few hours. For a patch, you’re looking at a few weeks. Remember, if your driveway is in need of serious repairs, having it repaved altogether may be a better solution. Our team can inspect your asphalt and advise you of the best option.
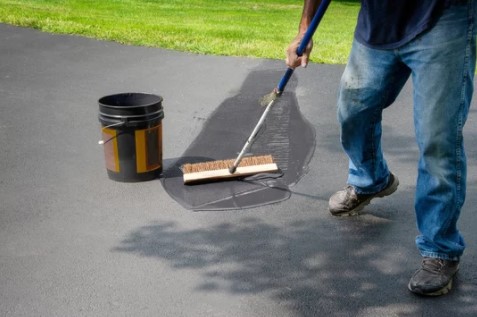
Start sealing.
Now’s the fun part! After making sure your driveway is still super clean, you can mix up the sealant and start with the edges. You’ll probably have to do this by hand, but a good outline sets the tone for the rest of the job. Then, pour the sealant horizontally along your driveway, using a large squeegee to compress it as you go. Beware of pushing too hard, which can cause lines to appear. Or not pushing hard enough, which can leave the layer of sealant too thick. It’s often hard, heavy work, so don’t be afraid to ask for help!
Once you’ve completely covered your driveway, take a look at your efforts! Does it look like the sealant is even? Is it the color/texture you wanted? If needed, you can always apply a second coat—especially when your asphalt is older. Then, take a break and let it dry. Hopefully you picked a good day because the sealant will take a good 24 hours before you can walk on it and more like 48 hours before you can drive over it again.
Having a paved driveway is an undeniable asset, but even low-maintenance options will still need some care, every once in a while. If yours is looking a little rough these days, keep these tips in mind. For those that are looking really rough, give us a call! We’re a lot more than fencing and decking. We’d be happy to help you repave your driveway or install it for the first time!